
Easiest way to flash your Sonoff, Shelly, Wemos or any ESP8266
Today I will be showing you the easiest way to flash1 any ESP8266 device using a TTL (aka Serial) adapter. I will be using the Sonoff Basic to demonstrate, but the process is similar for other ESP devices - Shelly, Tuya, MagicHome, Wemos, H801 and many more.
I will show you how to flash Tasmota and then how to add HomeKit functionality using HomeKit Accessory Architect.
You can follow this tutorial to install any firmware for ESP8266 on your device - Tasmota, ESPHome, ESPEasy, ESPurna and others.
Flashing ESP8266
Shortcuts: Flash Mode / Adding HomeKit support / JSON strings for HAA
Prerequisites:
- USB-to-Serial/TTL Adapter - Amazon / AliExpress
- Device (any of the ones below)
- Sonoff Basic - Amazon / AliExpress
- Sonoff Mini - AliExpress
- Shelly 1 - Amazon
- Shelly Dimmer - Amazon
- Software
Connecting to ESP for Flashing
First things first. Connect the TTL Adapter to your ESP device.
USB Serial - ESP Device
       GND -> GND
        TX -> RX
        RX -> TX
      3.3V -> 3V3
NodeMCU PyFlasher
One of the best tools for flashing, in my opinion, is NodeMCU PyFlasher. It is a self-contained Python program, which means that you don’t need to install Python, pip or esptool.py. As long as you download and install NodeMCU PyFlasher, you should be good to go.
If you don’t see your serial adapter in the application, this is probably due to driver error. Try downloading and installing a driver for your serial adapter [from here](https://www.ftdichip.com/FTDrivers.htm).
Tasmota
For the purposes of this tutorial, I will be using Tasmota to show you how to flash you ESP.
Tasmota works with a wide (probably the widest of all) range of products and that is one of the reasons it is the most popular solution. As with the other options, you can use Tasmota to program your device to be whatever you want it to. What sets Tasmota apart from the others is its wide support of devices AND support for almost any type of sensor.
Tasmota supports MQTT, HTTP, Serial and KNX but most often it is used when you want to use MQTT or HTTP. Updates can be done OTA.
MQTT is an ISO standard publish-subscribe-based messaging protocol. In order to use MQTT, you need a server acting as a MQTT Broker, which your MQTT devices use as the middleman connecting them.
Downloading Tasmota
Download the latest tasmota.bin or if you want it translated into your language - tasmota-BG.bin (for example Bulgarian language)
Flashing Tasmota on device
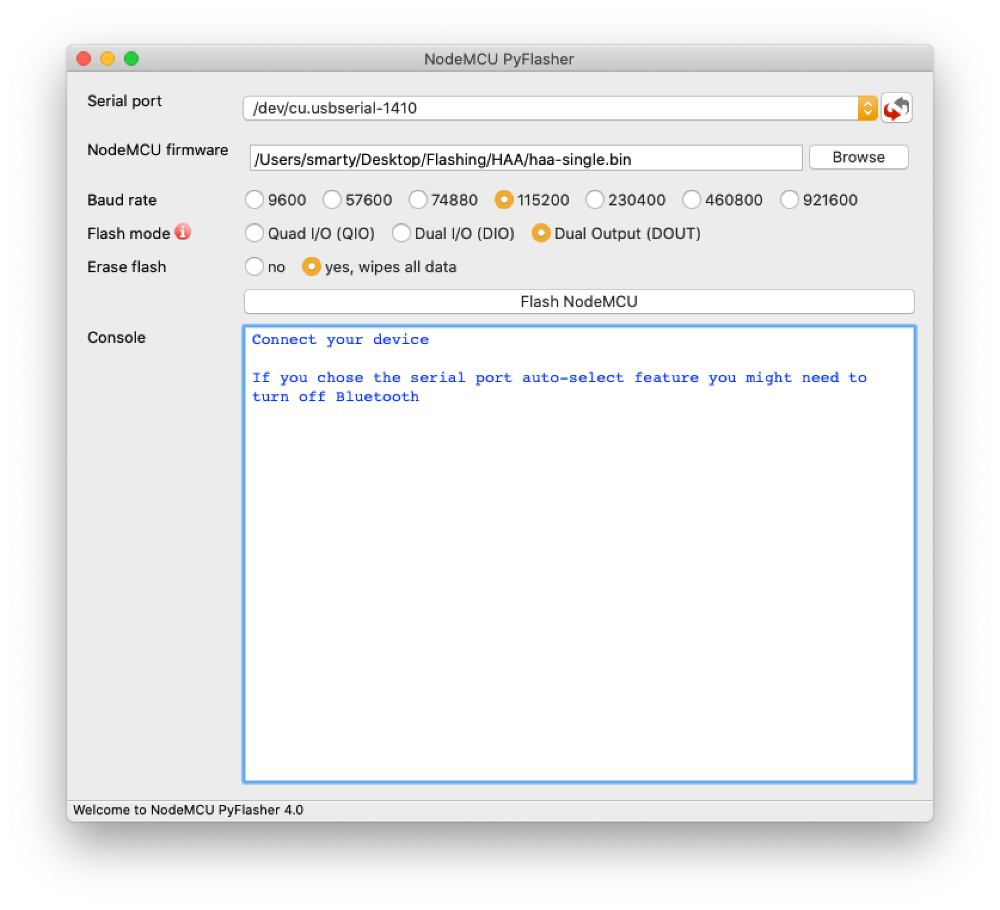
To begin, open up the NodeMCU PyFlasher.
To see your serial adapter, it should be plugged in to the computer.
Then after you select the firmware you want to flash.
Keep the speed at the default value, set the Flash mode to Dual Output (DOUT) and set yes to wipe data.
Keep in mind that flashing a firmware removes the old one.
Flash mode
Now, before clicking Flash, we need to put the device in Flash mode.
Disconnect the Serial adapter from your computer
And to enter flash mode, Hold the device button or if there isn’t any, connect GND to GPIO0.
Make sure to do that while plugging it in and a few seconds after that.
And now we can proceed by hitting Flash NodeMCU
Now just restart it and it will boot into Tasmota or whatever firmware you just flashed.
Adding HomeKit support to ESP
So far so good, but how do we flash firmware consisting of more than one file? One such firmware is HomeKit Accessory Architect, which when setup gives you native HomeKit support. No hubs. No hustle.
The HomeKit Accessory Architect firmware consists of these three files. To flash a multipart firmware, we need to first squeeze it into one file.
Squeezing multiple bin files into one
This step is no longer required, as the fw developer started compiling (concatenating) the firmware file in one .bin file. You can skip to Flashing HomeKit Accessory Architect on ESP8266.
To achieve that, open Terminal and download the firmware files if you haven’t already.
I will put them in a new folder for simplicity.
mkdir HAA
Go into the new folder
cd HAA
I will use the wget command to download the files. Enjoy my pretty oneliner.
wget https://github.com/RavenSystem/haa_ota/releases/latest/download/haaboot.bin | wget https://github.com/SuperHouse/esp-open-rtos/raw/master/bootloader/firmware_prebuilt/rboot.bin | wget https://github.com/SuperHouse/esp-open-rtos/raw/master/bootloader/firmware_prebuilt/blank_config.bin
… or download the from your browser haaboot.bin, rboot.bin, blank_config.bin and put them in a folder HAA on your Desktop for example.
Okay, having the files in one place, we need to configure them so that each one goes where it is supposed to.
We will use the command truncate, giving it a perimeter of 4 kilobytes and we need to do that for rboot and blank_config.
truncate -s 4k rboot.bin
And we do the same for blank_config.bin (the third file is at the end so it doesn’t need tampering)
truncate -s 4k blank_config.bin
Afterwards, we will use the cat command which is going to stitch our three files together.
cat rboot.bin blank_config.bin haaboot.bin > haa-single.bin
If you are having problems with the previous step, I have uploaded a ready to use file for HomeKit Accessory Architect.
And there you have it, the multipart firmware in one file.
Beautiful.
Flashing HomeKit Accessory Architect on ESP8266
Download the Firmware from here.
Having that, to flash it onto your devices, simply open the PyFlasher and flash as normally.
Choose your serial adapter from the dropdown.
And make sure you have all the settings as they should be. (look above)
Disconnect the serial adapter, аnd put the device in flash mode
Then hit Flash and watch the magic happen.
Setting up HomeKit Accessory Architect
I will now walk you through the steps of setting up HAA.
After restarting the ESP, you should find your device as a Wi-Fi hotspot. Just connect to it and connect it to your home network.
In recent versions of the HAA firmware, to access the setup page you need to open http://192.168.4.1:4567 in your browser while connected to the device via WiFi.
Before hitting Save, you must enter a config JSON. This tells the firmware what the device is and how it is set up.
Configuration JSON Strings for Homekit Accessory Architect:
Sonoff Basic / SV / Mini / TH / POW:
{"c":{"l":13,"b":[{"g":0,"t":5}]},"a":[{"0":{"r":[{"g":12}]},"1":{"r":[{"g":12,"v":1}]},"b":[{"g":0}]}]}
Shelly 1:
Switch with external toggle
{"a":[{"0":{"r":[{"g":4}]},"1":{"r":[{"g":4,"v":1}]},"b":[{"g":5,"p":0},{"g":5,"t":0}]}]}
MagicHome RGB Controller
Find out how to build yourself the best HomeKit RGB Controller for your money.
After flashing HAA and configuring it, the firmware needs 5-6 minutes to download the latest version of the firmware so be patient.
If the device button or led is unresponsive it is probably still loading.
Adding to Home app
After it has finished, you can open the Home app on an iPad or iPhone and add your new device.
To do that, open the Home app and tap on the + button, and then Add Accessory. Point your camera to one of the images bellow:


Now you can set it up as a Light, Fan or whatever else you want.
This firmware also supports over the air updates, so you don’t need to physically open the device again to update the firmware.
If you are having issues, please check for solution here - Frequently Asked Questions for HomeKit Accessory Achitect (FAQ) or join our Discord channel and we will solve the problem. :)
What device did you flash? Comment down below.
I hope that was helpful. Make sure to subscribe so you don’t miss my future videos. Many more cool projects and tutorials to come.
Take care and be Smarty.
Flashing your device by following my instructions you do it at your own risk. Opening some devices to flash them might void their warranty. Furthermore, flashing HAA or other firmware removes the old one and if you want to get it back, you need to re-flash that manually.
-
To flash a device means to change it’s firmware (software) ↩