
HomeKit Light switch using Sonoff T1
Today we will be making our lights and fan smart and HomeKit compatible.
I have mine configured to turn on the light , while I am using the second button to turn on the bathroom Fan for 30 minutes on a single tap, double-tap turns it off and a long tap turns on my Water Heater. These are all configurable options and I will show you how you can do it too.
I will be using the Sonoff T1 with two relays, but the process is the same for all versions of this device (newer T1, TX etc) and also for other Wi-Fi relays such as the Shelly as they all use the ESP8266 chip.
Shortcuts: Flash Mode / JSON Strings / Adding to Home app / Making the smart switch smarter
Lets begin
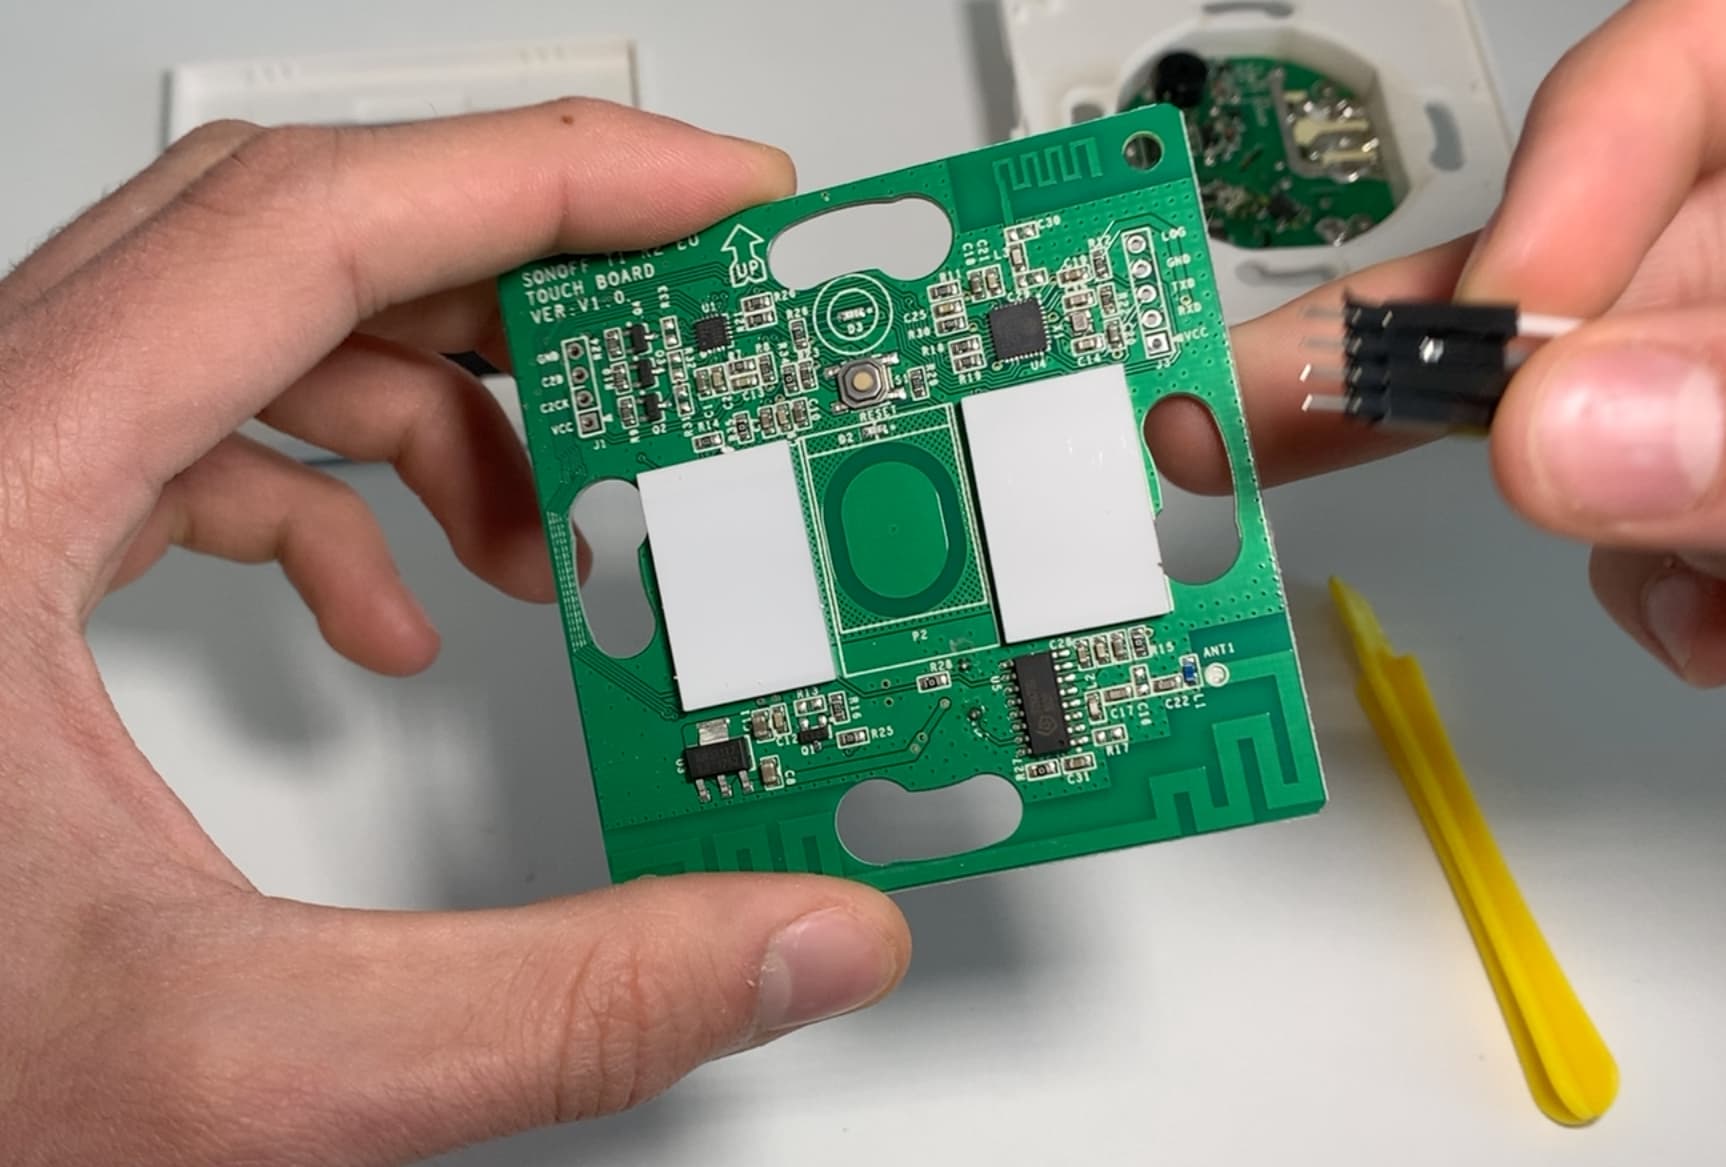
You can easily open the case of the device. And after we’ve done that, gently separate the top part of the board from the bottom.
The Sonoff devices have heir own Chinese firmware and if we want it to have HomeKit support and make it useful, we need to change its software.
Flashing the device
This next part I have covered in another video, so please head over there to watch/read it first, and then continue with the next steps. I will cover it briefly.
Prerequisites
- USB-to-Serial/TTL Adapter - Amazon / AliExpress
- Device
- Sonoff T1 - Amazon / AliExpress
- Software
This is the board we will be working with. We can easily connect to it without soldering.
Connecting to ESP for Flashing
Connect the TTL Adapter to your ESP device like so.
USB Serial - ESP Device
       GND -> GND
        TX -> RX
        RX -> TX
      3.3V -> 3V3
We then need to open our flashing tool of choice and prepare it for flashing.
Flash mode
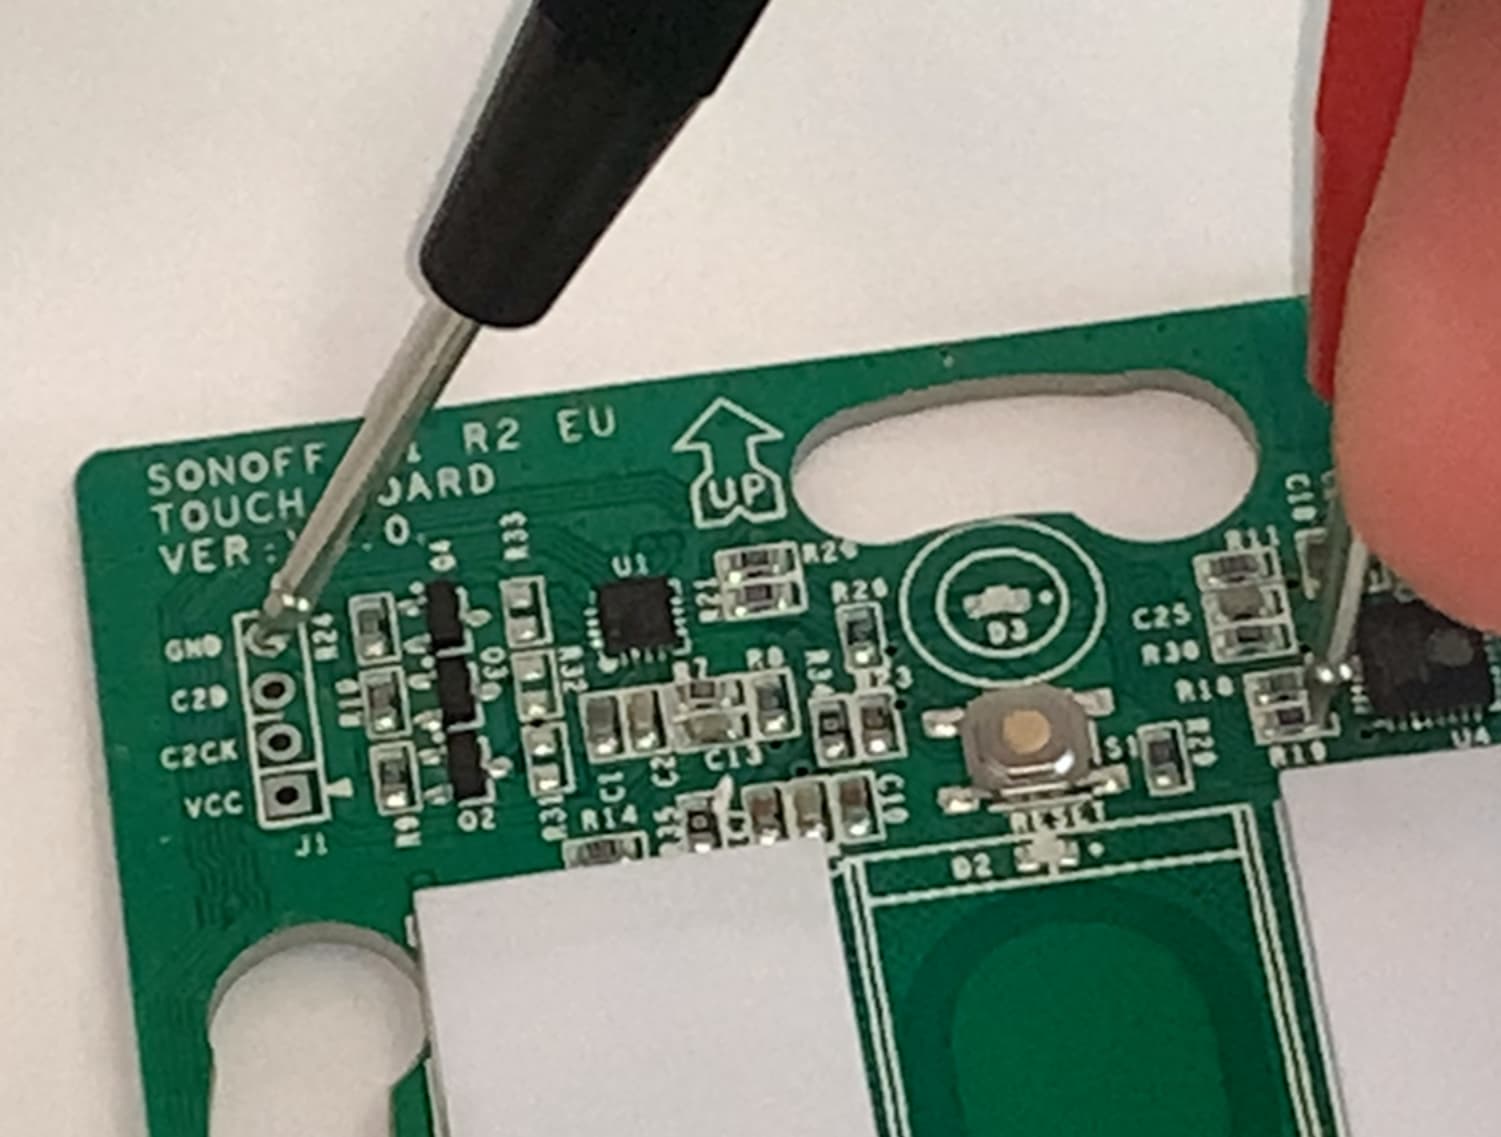
To put the board in Flash mode, which is required for flashing,
First disconnect the serial adapter
I will be using a cable that came with my multimeter. We need to connect Ground to a pin named R19, while booting.
I will hold the cable with one hand, while with the other I connect the flashing adapter to my computer and while doing so, making sure to have a steady serial connection to the board.
Hold for 5 to 10 seconds after boot and then release.
After that, the board should be unresponsive and we can continue by hitting Flash on the computer.
When flashing is complete, reboot the board by reconnecting it to power.
For initial setup, it will go to AP mode and we can now connect to it using WiFi.
Ooor at least, we should be.
Okay. We are connected to the Wi-Fi hotspot, but it won’t load the page.
If you have the same issue… open http://192.168.4.1:4567
In recent versions of the HAA firmware, to access the setup page you must to open http://192.168.4.1:4567 in your browser while connected to the device via WiFi.
Configuration JSON strings for HAA
Now we can go ahead and set it up by setting a config JSON.
I have posted a bunch of options for you to choose from depending on your needs.
Sonoff T1 / TX (1 gang) 1
Basic switch with button controlling the relay:
{"c":{"l":13,"b":[{"g":0,"t":5}]},"a":[{"0":{"r":[{"g":12}]},"1":{"r":[{"g":12,"v":1}]},"b":[{"g":0}]}]}
Switch with seperate accessory for programmable button, button not controlling relay directly:
{"c":{"l":13,"b":[{"g":0,"t":5}]},"a":[{"0":{"r":[{"g":12}]},"1":{"r":[{"g":12,"v":1}]}},{"t":3,"f0":[{"g":0,"t":1}],"f1":[{"g":0,"t":2}],"f2":[{"g":0,"t":3}]}]}
Sonoff T1 / TX (2 gang) 2
Basic switches with buttons controlling the relays:
{"c":{"l":13,"b":[{"g":0,"t":5}]},"a":[{"0":{"r":[{"g":12}]},"1":{"r":[{"g":12,"v":1}]},"b":[{"g":0}]},{"0":{"r":[{"g":5}]},"1":{"r":[{"g":5,"v":1}]},"b":[{"g":9}]}]}
Button 1 controls relay 1, button 2 is separate programmable button:
{"c":{"l":13,"b":[{"g":0,"t":5}]},"a":[{"0":{"r":[{"g":12}]},"1":{"r":[{"g":12,"v":1}]},"b":[{"g":0}]},{"0":{"r":[{"g":5}]},"1":{"r":[{"g":5,"v":1}]}},{"t":3,"f0":[{"g":9,"t":1}],"f1":[{"g":9,"t":2}],"f2":[{"g":9,"t":3}]}]}
Button 2 controls relay 2, button 1 is separate programmable button:
{"c":{"l":13,"b":[{"g":0,"t":5}]},"a":[{"0":{"r":[{"g":12}]},"1":{"r":[{"g":12,"v":1}]}},{"0":{"r":[{"g":5}]},"1":{"r":[{"g":5,"v":1}]},"b":[{"g":9}]},{"t":3,"f0":[{"g":0,"t":1}],"f1":[{"g":0,"t":2}],"f2":[{"g":0,"t":3}]}]}
Switches with programmable buttons, buttons not controlling relay directly:
{"c":{"l":13,"b":[{"g":0,"t":5}]},"a":[{"0":{"r":[{"g":12}]},"1":{"r":[{"g":12,"v":1}]}},{"0":{"r":[{"g":5}]},"1":{"r":[{"g":5,"v":1}]}},{"t":3,"f0":[{"g":0,"t":1}],"f1":[{"g":0,"t":2}],"f2":[{"g":0,"t":3}]},{"t":3,"f0":[{"g":9,"t":1}],"f1":[{"g":9,"t":2}],"f2":[{"g":9,"t":3}]}]}
Sonoff T1 / TX (3 gang) 3
Basic switches with buttons controlling the relays:
{"c":{"l":13,"b":[{"g":0,"t":5}]},"a":[{"0":{"r":[{"g":12}]},"1":{"r":[{"g":12,"v":1}]},"b":[{"g":0}]},{"0":{"r":[{"g":5}]},"1":{"r":[{"g":5,"v":1}]},"b":[{"g":9}]},{"0":{"r":[{"g":4}]},"1":{"r":[{"g":4,"v":1}]},"b":[{"g":10}]}]}
Next, connect it to your home network and hit save.
It will then reboot and begin downloading the latest version of the firmware, so give it at least 5 minutes time.
The device will be unresponsive during this process.
Adding to Home app
After it has finished, you can open the Home app on an iPad or iPhone and add your new device.
To do that, open the Home app and tap on the + button, and then Add Accessory. Point your camera to one of the images bellow:


Now you can set it up as a Light, Fan or whatever else you want.
This firmware also supports over the air updates, so you don’t need to physically open the device again to update the firmware.
Wiring the device and mounting it
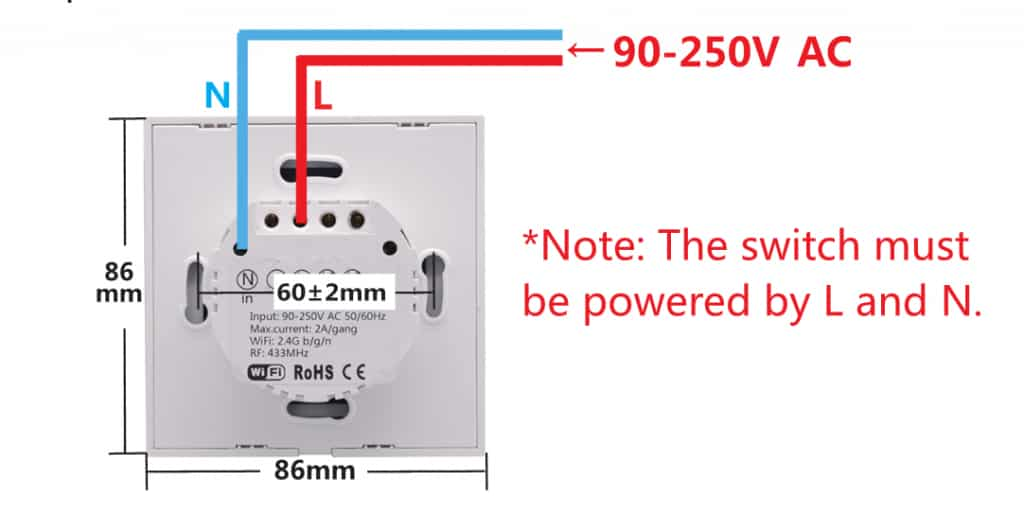
Most traditional light switches don’t have a neutral wire, like mine and I have taken Neutral from this outlet here.
If you can’t get a neutral wire to the switch, another option is to use the Sonoff T4EU1C, which doesn’t require a Neutral.
I will soon make a video on this one, but the procedure should be the same.
When working with electricity, always turn off the breaker and make sure that there is no current. Mains voltage could kill you.
It is always good to crimp cable ends for a more secure grip.
After you connect it, turn on the power from the breaker and check if it works well.
If all is good, turn off the power again and mount it properly.
Keep in mind, that the Sonoff T1 has only 2A relays, which can technically withstand 440W, but really you shouldn’t put more than 300W loads on it.
And now I will show you how to get more smarts from a smart switch.
Making the smart switch smarter or more useful
For this step, you need to go to the IP address or hostname of the device.
The hostname is the http://[default device name].local or http://[default device name].lan, depending on your network configuration.
You can also find its IP in your router settings or using Fing for example.
To be able to access these settings, you need to put the device in Setup mode. By default, to do that, you need to quickly turn on and off the device 7 times. It’s easier to do it on an iOS device.
When the device enters Setup mode, it will be unresponsive in HomeKit and we can reload the page.
Then you can set any of the other JSON configs I’ve listed or you can write your own.
Simply replace the old one and hit save.
This one that I am setting in the video will give us the two switches we expect, but the buttons will be added as separate accessories.
With this configuration, we can program the buttons to do more things on double tap or long press.
Using programmable buttons in HomeKit gives you a slight delay, because it is controlled by your HomeKit hub, rather than locally on the smart switch. But you can program them to do whatever you want, including more complicated automations.
For example, the way I like mine is, one button controlling the light directly and the other turns on the water heater on long press and on single tap it turns the fan on for a set time. All of this is configurable in the Home app.
That was it
If you are having issues, please check for solution here - Frequently Asked Questions for HomeKit Accessory Achitect (FAQ) or join our Discord channel and we will solve the problem. :)
What device did you flash? Comment down below.
I hope that was helpful. Make sure to subscribe so you don’t miss my future videos. Many more cool projects and tutorials to come.
Take care and be Smarty.
Flashing your device by following my instructions you do it at your own risk. Opening some devices to flash them might void their warranty. Furthermore, flashing HAA or other firmware removes the old one and if you want to get it back, you need to re-flash that manually.